Replacing your exterior door handle is a simple way to update your curb appeal or improve your home's security. The handleset is a version of a doorknob mechanism with a lever or handle instead of a knob on the exterior side, and it might have a handle or a standard doorknob on the inside. Replacement parts for similar models are standardized and typically fit right into the empty holes. The replacement procedure is much the same for most types, but models differ, so always check the instructions before you start.
Check the Backset
Video of the Day
The backset is the distance from the edge of the door to the center of the bore hole for the doorknob assembly. Most handlesets are compatible with the two standardized backset dimensions of 2 3/8 or 2 3/4 inches. Some models have adjustable latch assemblies, while many simply have two sets of holes to accommodate the different backsets. Just make sure your new handleset works for your door's backset.
Video of the Day
Compare Handleset Parts for Compatibility
Handlesets are part of the necessary exterior door hardware and are mostly interchangeable. Some manufacturers include a few extra parts to make it easier for them to adapt to existing doors. Some differences you might notice on handlesets include:
- Bushing or plate: Some models may include a bushing instead of a face plate on the latch assembly. The 3/4-inch bushing replaces the mortised-in face plate.
- Square or rounded: There are two types of plates available. One has square corners, the other rounded corners. Some manufacturers include them both in the kit. It's smart to check before purchasing.
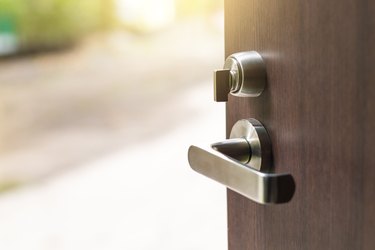
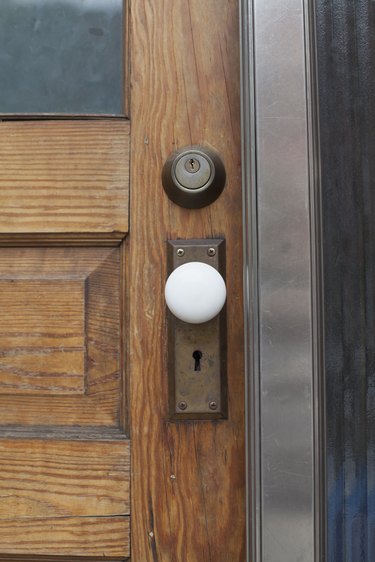
- Face plates: The decorative plate or escutcheon for the lockset is typically circular on sets with standard doorknobs. Handleset face plates are larger, typically rectangular, and have a mounting screw at the base.
Things You'll Need
Screwdriver or drill/driver
Chisel (optional)
How to Remove and Replace a Door Handle
Step 1: Remove the Screws
Remove the screws from the face plate behind the handle on the exterior side of the door, using a screwdriver or drill/driver. There may be only one mounting screw at the base of the plate. Remove all screws from the lever or doorknob on the inside.
Step 2: Remove the Levers
Grasp the interior knob or lever with one hand. Grasp the exterior handle with the other hand. Wiggle and pull on both at the same time to separate them. Pull them off the door.
Step 3: Remove the Latch Plate
Remove two screws securing the face plate of the latch assembly on the edge of the door. The latch cylinder is attached to the plate and comes out with the plate. If the plate is stuck inside a shallow mortise, pry it out with a screwdriver.
Step 4: Remove the Jamb Plate
Remove the two screws securing the strike plate on the door jamb. Remove the strike plate from the jamb. It's fine to use the old strike plate if it works with the new parts. Test the new handle, and leave the old plate on the jamb if desired
Step 5: Install the Latch
Insert the new latch assembly into the bore hole in the edge of the door. Make sure the latch bolt is facing in the proper direction; the curved side of the latch bolt should face the strike plate on the door jamb as the door is closed. Secure the latch assembly's face plate to the door with the two screws provided in the kit.
Tip
If your door doesn't have a mortise for the latch face plate, use the 3/4-inch bushing instead; it should be included in the kit. Remove the face plate from the latch and discard it. Tap the bushing onto the latch cylinder where the plate was removed.
Step 6: Join the Handles
Place the exterior handle on the door by inserting the spindle or axle on the handle through the latch cylinder at 90 degrees. Place the corresponding doorknob or lever on the interior side of the door, fitting the two parts together. It should feel slightly snug when the two parts join.
Step 7: Screw on the Handles
Insert two long screws through the face plate or escutcheon on each side of the interior doorknob or lever. Tighten the screws snugly, pulling the interior and exterior pieces together. Install any mounting screws on the exterior face plate, as applicable.
Tip
Tighten the interior knob/lever screws a little bit at a time, alternating from side to side. This helps keep the knob/handle straight to prevent binding. Don't overtighten the screws, which also causes binding, making the knob hard to turn.
Step 8: Install the Strike Plate
Screw the strike plate to the jamb, inside the shallow mortise. Skip this step if you decided to leave the old plate intact.
Test the Handle Installation
Shut the door. If the door sticks or binds, make sure the latch face plate is flush with the door edge and doesn't rub against the strike plate on the jamb. If the latch bolt isn't properly aligned with the hole in the strike plate, remove the strike plate and use a chisel to extend the mortise in the direction needed to realign the bolt with the hole, which shouldn't require much. Screw the plate back on and test the fit.
Replacing the Lever Only
If you break a lever, some models allow you to switch out only the lever without removing any other parts of the door handle during the process. Look for a small hole or oval-shaped opening on the shaft of the lever. Insert a paper clip, screwdriver, or another small pointed tool into the hole and push to depress a small spring-loaded pin. The lever should slip off. If it contains a setscrew, use a hex wrench to loosen it, slip the old lever off, and install a new one, reversing the procedure.