
There are more than 30,000 documented species of spiders in the world. These species are broken down into two categories: Web spinners and Hunters. The type of web each spider spins depends entirely on the spider’s way of life. There are four common categories of spider webs, with each species using a variation of one as their primary habitat or hunting method. It is impossible to identify the type of spider inhabiting a particular web without seeing the spider, but knowing the type of web will guide you in the right direction.
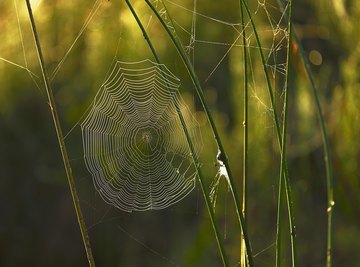
Orb Web Identification
Watch for orb webs in gardens or suspended between shrubs and small trees. Spiders that use orb webs include orange garden, banded, golden, and silver or humped orb weaving spiders. These spiders are not typically dangerous to humans.
Look for vertical placement and a rectangular frame.
Note the shape of the web. Orb webs look like a wagon wheel.
Look for the hub to be in the center of the web. Orb spiders will either reside in the center of the hub, or off to a side and hidden while waiting to catch prey.
Pay close attention in the morning to areas you suspect there might be a web. Orb webs are almost completely invisible. The best way to spot one is when it is covered in morning dew.
Tangled Web Identification
Watch for tangled webs to be in corners, attics, wood and rubble piles, in hollow stumps and under stones. Cluttered, undisturbed areas of a basement or crawl space are also locations to watch for tangled webs. Though common house spiders use a tangled web and are not dangerous to humans, black widow spiders also use tangled webs, and their neurotoxic venom can be fatal to humans.
Look for a disorganized jumble of sticky web. Tangled webs are often referred to as cob webs and do not have a definable pattern to them.
Look for a small funnel opening near the top of the web. This is most common in black widow spider webs; common house spiders typically build their webs near a crack in a wall.
Sheet Web Identification
Look for sheet webs to be low to the ground between shrubs and trees, and also between blades of grass. Doily, bowl, filmy dome and platform spiders use sheet webs.
Look for a thin flat sheet of web. Sheet web spiders will hang upside down underneath the web and wait for prey to be caught in the web.
Look for a crisscrossed net of silk thread above the sheet.
Funnel Web Identification
Look for funnel webs to be in wooded areas, small bushes, trees and in grass. Funnel webs are the most common type of web. Over 300 species of spider use funnel webs. Though most of these spiders are harmless to humans, the Australian funnel web spider is considered one of the deadliest spiders in the world.
Look for a funnel shape made of a sheet-like web that is open on two sides and narrow in the middle.
Watch for the web placement. Funnel webs are horizontal. These webs are sometimes confused with tangled webs, because tangled webs have a small funnel in one corner. A funnel web may have a tangled web around it, but the funnel is prominent and in the center of the tangle.
References
About the Author
Katrina Arthurs began her writing career in 1999. She served as a columnist for the "Edgewood News Herald" then as a reporter and production manager for the "KC Conservative." Arthurs is pursuing her Bachelor of Science in criminal justice at the University of Central Missouri.