
Not everyone is born with a good fashion sense, but everyone can learn how to dress in a way that’s stylish, comfortable, and most importantly, suits your lifestyle and personality. When you develop a good dress sense you will be able to walk into any store and know which clothes are right for you. A good dress sense means knowing what works for your body type, your age and your skin tone. Beyond this, it means feeling confident in your look.
Developing Your Personal Style
Think of how you ideally want to dress if money and body shape were not an issue. Decide what you want your clothes to say about you.
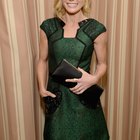
Picture a celebrity or model whose style you have always admired. Look through fashion and lifestyle magazines to get ideas. Clip some pictures of people you think have a good sense of dress.
Look at the pictures you noted in the magazines. While you can't always afford what the celebrities are wearing, you can use their looks as inspiration.
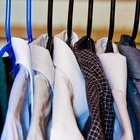
Go to your wardrobe and pick out those items that you love, the ones that you always feel good wearing. Separate them from those that you are not sure reflect your personal sense of dress or think might be out of date.
Look at the favorite items you found in your own closet. Try them on, stand in front of the mirror and think about what makes you feel good in them. Does the color suit your skin tone or bring out your eyes? Does the fit flatter your figure? Write down your notes.
Decide what you need to complete an outfit with the clothes that you love. For example, you have a great pair of black pants but no top to go with them. Make a list of the items you need to go with your favorite items. This will be your initial shopping list.
Dressing for Your Body Type
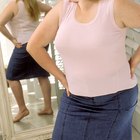
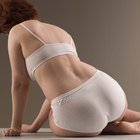
Stand in front of a mirror to determine your body type. Are you top heavy? Bottom heavy? Are your legs or torso on the longer or shorter side? Do you have curves or more of a straight body? Broad or narrow shoulders? Everyone is different, so knowing your body type is essential to a good sense of dress.
Study the right way to dress for your body type. You can find helpful tips in lifestyle and fashion magazines or on lifestyle television. Record the tips that are relevant to your body. For example, a fashion blog might suggest that a top heavy person wear a fitted blazer to complement the chest but also define a waist.
Take that list you made of ideal clothing and adjust it to suit your body type.
Shopping for the Right Clothes
Look for stores that sell the type of clothes that suit your sense of style, your body type and your age.
Talk to the salesperson. Tell her you're looking for a single-breasted fitted black blazer and ask for suggestions.
Try on clothes. This sounds simple, but try on everything you think you might like and everything that salespeople suggest. If you are just starting to find your sense of style, you might get new ideas from trying on outfits you never thought you would wear.
Look in the mirror or better yet bring a friend you trust. Your reflection itself might be subjective, however, so it is always good to get an outsider's opinion, especially if it's from a friend whose own fashion sense you respect.
Don't buy anything unless you love it. If you don't love the clothes in the changing room, you will probably not love them when you get them home.
Maintaining Dress Sense
Buy classic clothes instead of buying what's new and trendy this month.
Have an outfit for every occasion. Having a good dress sense means dressing appropriately for day-to-day life and special events. You should be prepared for the different situations of your lifestyle.
If your body changes, change your wardrobe. As you get older, you should want to dress differently. If you have lost 10 pounds and are keeping it off, buy new jeans and rethink what you might be able to wear at this new size.
Window shop. Even if you are not planning on adding to your wardrobe, window shopping at least keeps you updated on changes in today's fashion. You may also discover new ideas to broaden your sense of style.
Know what you like and don't like. Maintaining a good dress sense means being confident in your wardrobe choices. If you have never liked orange there's no reason you have to buy that orange dress just because it was featured in a magazine.
In the end, it's about feeling good through knowing what's best for yourself.
Related Articles
How to Dress for an Early 40-Year-Old
How to Follow "What Not to Wear" Style ...

How to Select Beauty Pageant Sportswear
Clothing Styles for Overweight Teens

How to Wear See-Through Clothing in ...
How to Dress a Big Stomach & Small Legs
How to Determine a Cross Dresser's ...
What Not to Wear When You Are Obese
What Is Casual Chic Dress for Men?
The Best Clothes for a Small Waist and ...

How to Dress for the Police Officer ...

How to Be a Confident Woman After a ...

How to Deal With Someone Who Criticizes
How to Create a Minimalist Wardrobe

How to Dress Like an Upper Class ...

How to Figure out the Size of a Suit by ...

How to Hide Your Midlife Tummy
How to Dress to Hide a Thick Waist

How to Make Good Judgment Decisions

How to Tell if Someone has Gone Through ...
References
Writer Bio
Andrea Whyte has worked as an academic and commercial writer since 2005. She has contributed to the "Canadian Film Encyclopedia" and written informative articles as a copywriter for a major Internet-marketing firm. Whyte holds a Master of Arts in cinema studies from the University of Toronto.
Photo Credits
Fashion image by Yvonne Bogdanski from Fotolia.com