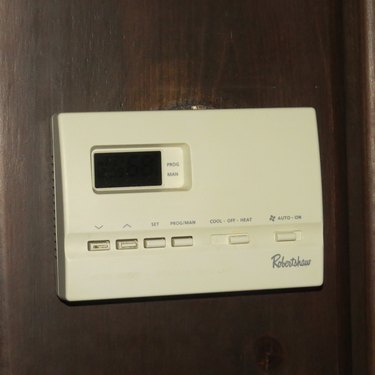
Robertshaw is a manufacturer of thermostats, zone controls, valves, timers, and other electronic HVAC control components. Their line of residential thermostats are user-programmable climate control devices that operate your home's heating and air conditioning systems. Factory-programmed Energy Star temperature set points allow you to use your thermostat as soon as it's installed. But if the pre-programmed set points don't meet your heating or cooling needs, you can customize the thermostat's programming schedule in minutes.
Step 1
To set the date and time:
Video of the Day
- Press and release the SET and PROG/MAN thermostat buttons simultaneously to access the clock and calendar programming mode.
- Press the UP or DOWN arrow buttons until the on-screen clock reflects the correct current time;
- Press SET to lock the time in.
- Use the UP and DOWN buttons to highlight the desired day of week indicator: select 1 for Monday, 2 for Tuesday, 3 for Wednesday, 4 for Thursday, 5 for Friday, 6 for Saturday, or 7 for Sunday. Press SET to lock this in once the correct day displays.
Step 2
Adjust the temperature differential to the desired value using the UP and DOWN arrow buttons; press SET to lock this in. Follow the same procedure to set the second temperature differential when it appears on the digital display screen.
Programming the desired temperature differential prevents the thermostat from cycling on too often. Robertshaw thermostats are factory-programmed to switch on whenever the temperature in the room changes by just one degree.
Step 3
The residual cool feature allows you to run the fan for an additional 30, 60 or 90 seconds. It causes the fan to run for a short while after the compressor shuts off, thereby making maximum use of the cool air in the system. To set this feature, use the UP/DOWN arrow keys to highlight the desired residual cool option and press SET.
Step 4
The Quick Set feature allows you to set a single heating or cooling program and use it for all seven days of the week. To set the program start times:
- Move the COOL/OFF/HEAT/EM" switch into the appropriate position to select the desired operating mode for your Quick Set program.
- Hold down the SET button, followed by the DOWN arrow button, and then let go of both buttons simultaneously.
- Use the arrow buttons to adjust the start time for the morning program segment when the MORN indicator appears—press the SET button to lock this in.
- Follow the same procedure to set the start times for the DAY, EVE, and NITE program segments.
Step 5
While the Quick Set feature can quickly set the same start times for all seven days of the week, you can also individualize the days. For example, you may want the program start times to be different on weekends than they are on weekdays. To individualize the days:
- Use the COOL/OFF/HEAT/EM Cool/Off switch to select the desired operating mode when programming each day of the heating or cooling schedule individually.
- Press SET to access the programming screen.
- Highlight the desired day of week indicator, using the arrow buttons; press SET.
- Select the program segment that you want to modify and press the SET button.
- Press the arrow buttons until the desired start time for the selected segment is shown on the display screen; press SET.
- Repeat this step to specify the start times for the remaining segments or to program the heating or cooling schedule for subsequent days.
Step 6
To set the fan options:
- Move the FAN/AUTO/ON switch into the ON position when you want to run the fan continually or to AUTO if you want it to run only when the thermostat is running an active heating or cooling program.
- Use the COOL/OFF/HEAT/EM switch to select between the HEAT and COOL operating modes.
Step 7
To activate the program mode :
Press the PROG/MAN button until the PROG indicator appears on the digital display screen. Your thermostat programming is now activated to run according to the schedule you have set.
Video of the Day