If you own a collection of related small objects that you can't bear to part with but don't want them cluttering up your living space, try embedding them into a liquid acrylic resin countertop. Because the objects are all related, you will create a piece of very personal artwork that also has a functional purpose. Create or remake a liquid acrylic countertop in your kitchen, family room, craft room or bar. It's a quick, inexpensive way to replace a worn-out countertop without completely remodeling.
How to Make a Liquid Acrylic Countertop
Video of the Day
Attach a frame of 1 x 2-inch lumber all around the countertop so that it will encase the liquid acrylic. Use small, headed nails to attach it to the wooden base of the countertop. Don't pound the heads of the nails all the way flush with the wood, to make it easier to remove the frame when the countertop hardens. If the objects you plan to embed in the resin countertop have a height of more than one inch, use 1-by-3-inch or 1-by-4-inch lumber for building the frame to accommodate them.
Video of the Day
After you've attached the wood, clean the surface of the counter with regular household degreaser cleaner, following the manufacturer's instructions. Be sure that the area where you are working is well-ventilated. If possible, keep children and pets away from your workspace until the area is aired out. This will help prevent inhalation of harsh chemicals.
Mixing the Acrylic Resin
The next step in making your cast acrylic countertops is to mix the acrylic resin with the hardener, exactly following the instructions on the label. Use an eyedropper, if necessary, to measure the hardener to ensure the proportions are exact. Mix in a non-waxed disposable cup using a wooden craft stick. Mix slowly by cutting the stick through the acrylic to minimize the number of air bubbles you introduce into the mixture.
Pour a thin layer of the mixture onto the countertop, approximately 1/2 inch thick. Allow the mixture to harden to the consistency of gelatin, following the manufacturer's label directions.
Set the objects you wish to encase in the acrylic on top of the almost-hardened first layer of acrylic. Whether you choose stone coat countertops or another epoxy-based variety, the sky is the limit.
Second Batch of Acrylic Resin
Mix a second batch of acrylic resin, carefully following label directions. Some brands of acrylic resin use a different proportion of hardener for the second and succeeding layers, so consult the label before mixing each successive layer. Allow it to harden or cure following the manufacturer's recommendations.
Continue building layers until you reach the top of the wooden frame, then allow the acrylic to set up for the manufacturer's recommended length of time. Remove the wooden frame from around the edge of the countertop.
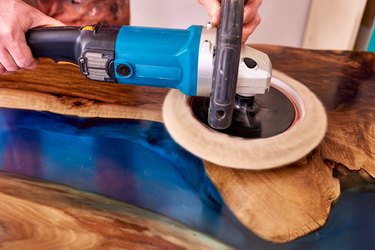
Sanding and Finalizing the Acrylic Countertop Surface
The surface and sides of the acrylic countertop need to be sanded lightly, to smooth out any imperfections. Use 200-grit or finer sandpaper and do not exert much pressure; you don't want to mar the surface of the fresh acrylic.
Encase the edge of the countertop with decorative trim or molding, if desired, for a finished look.