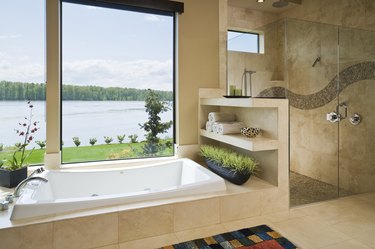
If your bathroom is a space for relaxation and stress relief as well as a place to get clean, you may have considered a sunken tub model. These kinds of tubs are installed partially or entirely below the floor level. This makes for a great luxury aesthetic and can really add character to the bathroom. However, installation can be tricky, so it's important to consider a few things before making the switch.
Preparing for Sunken Tub Installation
Video of the Day
Removing an existing tub to add in a sunken tub model is a bit of a chore. You'll have to cut into the opening beneath the floor to clear space, add supports and line up your utilities. This can require custom work and will also add cost. If you're willing to do this, the first step is to create a design that's beautiful, structurally sound and safe.
Video of the Day
Since a sunken tub can be a fall hazard in the dark, you'll want to make sure the tub isn't installed between the door and the toilet, and you'll probably want to have some kind of night lighting in the bathroom to make the edge clearly visible.
Designing a Sunken Tub
You'll also want to make sure the tub is safe to get in and out of. Some tubs that are installed semi-sunken (imagine halfway between a standing tub and a sunken one) have stairs to facilitate entry and exit. Fully sunken models will need nonslip materials around the edge of the tub so that extra bubbles or splashing don't create a slip hazard
Your first step in the actual tub design is to measure the available space in the bathroom to determine what size tub will be suitable. Keep in mind where the load-bearing walls are in the bathroom and adjust the arrangement accordingly. Based on this, choose a tub with dimensions that will fit within the designated space.
Preparing the Area
The next step is the deconstruction part of construction. Turn off the water to the bathroom; then remove everything from the installation space, including shelving, toilet, the previous tub and other fixtures.
Remove any utility connections that would be in the way and pull up any existing flooring materials that are in the way. The base layer should be wooden flooring material. Measure and mark where the sunken tub will sit; then cut through the flooring to create the opening for the tub.
Building the Framework
Next, it's time to build the framework that will support the tub. If you've purchased a tub model specifically designed to be sunken or semi-sunken, there may be guidelines or directions in the manual that can help you determine how much of a framework you'll need. Since most tubs are designed to sit above floor level, it may be tricky to determine the type of support needed.
Check with a contractor if you have questions about the design. You'll want to add wooden beams at the correct spacing to support; then connect them by nailing plywood between them. Mark in pencil where holes will need to be cut in the plywood for plumbing.
Placing the Tub
Assemble this frame outside the hole in the floor; then place the tub and make sure everything is level. Measure again to ensure that the holes for the plumbing line up properly with the tub; then cut away these access holes.
Once this final check is finished, put the frame in place inside the gap in the floor and attach it to the joists if needed. Set the tub in place and connect the plumbing. Be sure to finish and seal all of the edges of the project properly with caulk.