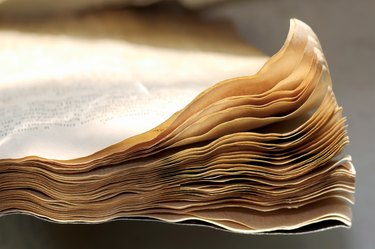
How To

How to Repair a Book

Contributor
By eHow Contributing Writer
(15 Ratings)

The repair of antique, historical or rare books requires special knowledge and should be left in the hands of professionals. There are some basic repairs, however, that you can perform on most books.

Difficulty: Moderately challenging
Instructions

Things You'll Need:

  • Acid-free Glue
  • Lint-free Cloth
  • Waxed Paper
  • Knitting Needle Or Skewer
  • Soft Brush
  • Vacuum
  • Waxed Paper
  • Rice Paper
  • Tweezers
  • Ace Bandage
  • Hair Dryer
  • Hydrogen Peroxide Or Denatured Alcohol
  • Peroxide Bleach Or Lemon Juice
  • Tweezers
  • Scissors
  • Dull Paring Knife
  • Scissors
  • Blotting Paper Or Paper Towels
  • Pencil Eraser
  • Rubber Cement
  • White Plastic Eraser
  • Very fine, worn sandpaper
  • Heavy books, covered bricks or a book press

    Tears and holes in pages

  1. Step 1

    Open the book to the page you are going to repair. Place waxed paper underneath the page to protect the underlying pages.

  2. Step 2

    Snip out a patch of rice paper that is at least 1/8 inch (3 mm) larger than the tear or hole. If you are repairing a tear, snip out a patch that is large enough to be folded over the page edge to cover both sides of the tear. Crease the rice paper patch where it will bend over the page edge.

  3. Step 3

    Apply acid-free glue sparingly to the rice paper and then use tweezers to smooth the rice paper over the tear or hole. Smooth out any air bubbles under the rice paper with the tweezers or your finger.

  4. Step 4

    Place waxed paper over the rice paper to protect the preceding pages. If you are fixing a hole, place a second rice paper patch on the other side of the page. If repairing a tear, simply fold the rice paper patch over the tear.

  5. Step 5

    Close the book and place it under heavy books (phone books are good), covered bricks or a book press to weigh it down while the glue dries. Allow the glue to dry overnight, then carefully open the book and remove the waxed paper. Repeat with a second layer of rice paper if necessary. The text will still be legible through the transparent rice paper.

  6. Dirt, stains or markings

  7. Step 1

    Brush away any debris with a soft brush before you attempt other repairs. Carefully scrape away caked-on stains, such as wax drippings, with a dull paring knife.

  8. Step 2

    Remove pencil markings and dirt smudges with a white plastic eraser. Erase gently, working from the spine outward to the page's edge. If the paper is colored, test on an inconspicuous spot to make sure the eraser doesn't remove the coloring. Use a soft brush or a vacuum to remove eraser dust.

  9. Step 3

    If an eraser doesn't remove a marking (such as ink), try to rub it away with very fine, well-worn sandpaper. Be gentle as you use the sandpaper--discontinue immediately if the paper deteriorates or becomes thin. Don't use sandpaper near printed text as it will remove the ink. Brush or vacuum away dust.

  10. Step 4

    Cover crayon markings or grease stains with a generous amount of rubber cement. Allow the rubber cement to dry and then rub it off in little balls. It will remove much of the stain with it. Repeat if necessary and then remove any residual stain with a pencil eraser or fine sandpaper. Don't use rubber cement on printed text as it will strip away the ink.

  11. Dampness and mildew

  12. Step 1

    Place blotting paper or paper towels between each page of the book and then place it underneath heavy books, covered bricks or a book press to press out moisture. Replace the blotting paper or paper towels every half hour until the book is completely dry. This may take several days.

  13. Step 2

    Or stand the book upright and ajar so that the pages are separated. Hold a hair dryer at least 6 inches (15 cm) away from the pages and blow-dry the book. Reduce warping by pressing the book under heavy books, covered bricks or a book press. Some warping will be inevitable.

  14. Step 3

    To remove mildew from a book, dust away any loose mildew with a fine brush. If the book is damp, dry it completely. Then apply hydrogen peroxide or denatured alcohol to the book with a lint-free cloth to kill the mildew. Blot away excess liquid and dry the book thoroughly.

  15. Step 4

    Remove dark mildew stains with diluted peroxide bleach or lemon juice. Apply sparingly and dry thoroughly afterward. Dry the book in the sun if you use lemon juice.

  16. Broken spine or hinge

  17. Step 1

    Insert waxed paper between the cover and first and last pages, between the cover and the hinge, or between any pages that might come into contact with glue.

  18. Step 2

    Apply acid-free glue sparingly to the separated hinge or spine. Use a knitting needle or barbecue skewer to insert the glue along the length of the spine between the cover and the binding. An acid-free glue stick works especially well for repairing paperback spines and covers. Blot away any excess glue from the cover, hinges, spine and pages.

  19. Step 3

    Wrap the entire book in waxed paper and then wrap the book firmly in an Ace bandage to hold it in place while the glue dries. Make sure the spine and hinges are properly aligned. Weight the book under heavy books, covered bricks or in a book press overnight.

  20. Step 4

    The next day, carefully remove the bandage and waxed paper.

  21. Step 5

    Use cloth tape to reinforce a book spine only if the book is for utility or educational purposes. It ruins the collector value.

  22. Step 6

    If the spine of the book needs replacing, consult a professional book restorer.

Tips & Warnings
  • Buy high-quality rice paper and acid-free glue appropriate for paper at an art supply store.
  • Test your repair techniques on a book that you don't care about before you perform repairs on your cherished books. Never perform a repair that might cause irreversible damage to a book. If in doubt, consult a professional.
  • Inquire at a used or antique bookstore to find a qualified book restorer.
  • Use a lambswool duster to remove dust from a book, or vacuum it using a brush attachment every six months. Wipe leather book covers with leather cleaner. Never use detergent or water to wash a book.
  • Store books in an area where they will be protected from moisture or excessive dryness, sunlight, extreme temperatures, insects and mice. Shoving too many books onto a shelf will damage book spines, as will tilting or leaning books.
  • Ensure that the area where you are storing the books is dry. Purchase a dehumidifier if necessary to remove moisture from the air. A bit of lavender oil rubbed into the bookshelves can help prevent mildew.

Post a Comment

Post a Comment

eHow Article: How to Repair a Book

  • Have you done this? Click here to let us know.
I Did This

Related Ads

Get Free Arts & Entertainment Newsletters

Copyright © 1999-2009 eHow, Inc. Use of this web site constitutes acceptance of the eHow Terms of Use and Privacy Policy.   en-US

Demand Media
eHow_eHow Arts and Entertainment