
How to Fix a Tight or Loose Window Sash
If your double-hung windows are too loose, they may rattle in the wind, admit street noise and leak large volumes of air, causing drafts and wasting your precious energy dollars. Too tight, and you'll find them difficult or impossible to open and close. Finding the right balance is easy.
Things You Will Need
- Fiberglass Insulation
- Candle Wax Or Talcum Powder
- Window Weather-stripping Kit
- Nails
- Safety Glasses
- Sandpaper
- Flexible Stick Or Rod
- Hammer
- Rubber Mallet
- Screwdriver
- Sharp Chisel
- Sharp Paint Scraper
- Wood Block
- Primer, paint and paintbrush
- Window zipper, putty knife or spackle knife
Tip
When nailing in window stops, insert a flexible putty knife between the stop and the sash (next to where you're driving in the nail) to maintain the proper distance between them. Keep your paint scraper's blades sharp by frequently touching up the edge with a metal file. If you are installing new sash channels and the weight pulleys are painted into place, as is often the case, you can hammer the pulleys into the opening.
Warning
Wear safety glasses for most of these tasks.
-
Try a sharp blow to the center rail, near the locking point, with the palm of your hand or a rubber mallet. That can break the bonds that sometimes form between painted surfaces, in this case the two rails.
-
If that fails, try tapping a wood block against the sides of the sash to break a similar bond between the stops and sash. Be gentle; too hard a tap can crack the glass.
-
If the problem is a painted-over joint, it's best to cut it, either with a window zipper (a serrated-blade tool designed for this purpose) or with any flat-blade tool, such as a putty knife or spackle knife. Hold the blade flat against the face of the sash and push the blade's edge into the joint as you draw the tool along the surface. A utility knife is harder to control.
-
Lubricate the channels of a too-tight sash with candle wax or talcum power, which also effectively keeps painted surfaces from sticking together.
-
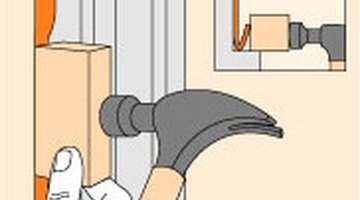
If the windows have V-shaped spring-metal weather-stripping in the channels, you can decrease tension by hammering the strip flatter with a block of wood and hammer (see A). You increase friction by prying the V open with a screwdriver. In both cases, have the sash in its fully open position.
-
If you have an old, loose window that lacks weather-stripping, you can kill two birds with one stone by installing weather-stripping. Some types mount in the channels, some mount on the stops and against the sash, and some mount between the stops and the sash. Follow the directions on the package.
-
If there is too much paint buildup on the sash or stops, you need to make more room. Start by using a sharp paint scraper to remove excess paint from the faces of the channel moldings: namely, the window (interior) stop, parting strip (middle) and blind (exterior) stop. Raise and lower the sash as needed.
-
On a lower sash, you can usually fix the problem by removing the window stop, then scraping and sanding the edge that faces the window before reinstalling the stop. The blind (exterior) stop for an upper sash is often locked into place with casing (trim), and you can't move it in or out to adjust friction.
-
If that fails, remove both sashes from the inside (see <a href="http://www.ehow.com/how_115247_install-new-sash.html" target="_top">How to Install New Sash Cords in Windows</a>). Scrape, sand or strip off all the paint to the bare wood. Repaint the sash, and reinstall it when the paint is completely dry.
-
Lastly, you can install new friction channels, which have the added advantage of eliminating uninsulated weight cavities. The weight cavities in a home account for tremendous heat loss in cold climates. First remove the sashes and any weights and pulleys (see <a href="http://www.ehow.com/how_115247_install-new-sash.html" target="_top">How to Install New Sash Cords in Windows</a>).
-
Stuff fiberglass insulation into the access openings for the weight cavities. Push the material up to the top first, using a flexible stick or rod, and then work your way down.
-
Use a hammer and a very sharp chisel to notch the ends of the top parting strip for the new channels.
-
Place the sashes between the two channels and tilt that assembly into the opening, bottom first, from the inside (see B).
-
Reinstall the interior stops, following the manufacturer's instructions for adjusting tension. Basically, the harder you press the stops against the sash before nailing them into place, the more friction you create.
-
If you find that the windows are too loose after you've installed the stops, you can increase the tension by hammering a wood block against the stop at the nail locations. Drive in a few more nails when the tension is just right.

The Drip Cap
- If your double-hung windows are too loose, they may rattle in the wind, admit street noise and leak large volumes of air, causing drafts and wasting your precious energy dollars.
- Finding the right balance is easy.
- Be gentle; too hard a tap can crack the glass.
- Lubricate the channels of a too-tight sash with candle wax or talcum power, which also effectively keeps painted surfaces from sticking together.
- If that fails, remove both sashes from the inside (see <a href="http://www.ehow.com/how_115247_install-new-sash.html" target="_top"How to Install New Sash Cords in Windows</a).
- The weight cavities in a home account for tremendous heat loss in cold climates.
- Reinstall the interior stops, following the manufacturer's instructions for adjusting tension.
- If you find that the windows are too loose after you've installed the stops, you can increase the tension by hammering a wood block against the stop at the nail locations.
Writer Bio
This article was written by PocketSense staff. If you have any questions, please reach out to us on our contact us page.
More Articles