How to Highlight a Man's Hair. Hair highlights aren't just for women anymore. Many men are using hair color to change their look as well. For those who want to add some color to their style here is how to get hair highlights for a man.
Having Your Hair Highlighted at a Salon
Find examples of hair highlights for a man that you like in magazines. Subtle highlights can be hard to detect so if you see a man's hair that you like the color of keep those aside as well. You'll want to cut out those pictures or remember the person's name (if it's a celebrity) so you can give examples to your stylist of what you like.
Be sure to tell the salon you plan on having your hair highlighted when making your appointment. Also, if you are still unclear on what type or color of highlights you want you may want to ask that they leave extra time in the appointment for a consultation. Stylists work best when they're not rushed, so make sure plenty of time is given for your visit.
Avoid putting hair products in your hair for your appointment. Most stylists like to do hair highlights on dry hair and having your hair loaded with styling gel can make working with your hair difficult. If this isn't possible you may have to have your hair washed and dried before the process can begin.
Consult with your stylist on your highlighting options at your appointment. Be sure to tell her if you're looking for a subtle effect or if you want your hair highlights to be more noticeable.
Discuss placement of the hair highlights before the process begins. You may want to start out with only a few subtle highlights in the front of your hair or have them placed all over to blend in with your natural color.
Ask your stylist which color she'll be using. It never hurts to know what's being used on your hair so that you can either try to do the highlights at home (perhaps you have a willing girlfriend who'll do it for you) or if you ever change salons or stylists.
Be sure your stylist dries your hair so you can check out the true color of your new highlights after the highlights have been completed. Have a good look at them and make sure they're what you wanted. If they are too light they can be darkened with a toner (a slightly darker color rinsed through the hair). If they aren't light enough the process might have to be done again. This is why the consultation process is so important-getting it right the first time is so much easier.
Be sure to take good care of your new hair highlights after you leave the salon. Using a shampoo and conditioner for colored hair will help keep your hair healthy. Also, avoid prolonged exposure to the sun which will bleach out and change the color of your highlights.
Highlighting your Hair at Home
Go to the store and purchase a home hair highlighting kit. It is safest, especially if this is your first time highlighting your hair, to choose a color only 2 to 3 shades lighter. Don't stray too far from your natural color or the results could be less than stellar. If you have dark brown hair try a light golden brown or dark blonde color. Blondes can get a great effect with subtle highlights in a blonde two shades lighter, such as light platinum blonde.
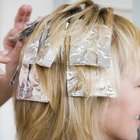
Consider the type of hair highlights you want. There is specific hair highlighting kits for each procedure. For highlights all through the hair a kit that uses a plastic highlighting cap is your best bet. For just a few highlights in the front or top of the hair a "paint on" kit with a specialized brush works best.
Select a room to work in. The bathroom is the best place to perform the highlighting. If not a bathroom then a well lit kitchen works too. You'll want a place with good lighting, no carpet (in case of spills) and little clutter.
Draped an old towel over your shoulders to catch any color drips.
Read the directions accompanying your highlighting kit thoroughly before beginning. It is very important to follow the directions for the best results.
Tie the cap tightly but comfortably to your head if using the cap method. Use the provided metal hook to carefully pull fine pieces of hair through the cap's holes. The traditional amount to pull through is a fine piece in every second hold in every second row for an all over highlighted effect. The smaller the section the more it will blend with your own hair color-thicker pieces will stand out more.
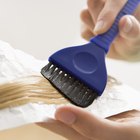
Comb your hair as you'd usually wear it is using the paint on method. Decide where you'd like to have your hair highlights placed. In the front bangs or along any part is a good place to start.
Apply the color as directed to the highlighting brush and brush the color through the areas you want highlighted. Be sure to have enough color on the brush to coat the sections of hair to be highlighted-but beware of excess color that may bleed or drip onto hair you don't want colored.
Follow the timing directions suggested and keep the color on the full time.
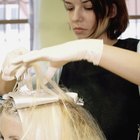
Rinse your hair thoroughly as directed to remove all the color once the processing time is completed.
Dry your hair completely to check the color results. If there are any problems with the results consult the toll free help line of the company or seek the advice of a professional stylist.
Related Articles

How to Highlight Hair Using a Cap
How to Dye Your Hair Dark With Blond ...

How to Cover Small Amounts of Gray Hair
How to Get Rid of Highlights in Your ...
Are Foil or Cap Highlights Better?

How to Color Block Hair With Foiling
How Are Highlights Done in a Salon?
How to Color Stubborn Gray Hair Without ...

How to Dye Sideburns

How to Highlight the Crown of Your Hair
How to Correct Uneven Blond Bleaching

How to Darken Bright Red Hair
How to Avoid Leopard Spots From Hair ...
How to Do Platinum Highlights at Home ...

How to Color-Rinse Black Hair
Root Darkening Color Techniques
How Can I Keep My Newly Highlighted ...

Difference Between a Weave & Highlights

Tips for Raw Hair Dye in Candy Pink

How to Perm African American Hair
Writer Bio
Cindy McKie is a former professional hairstylist with over 10 years experience in the industry. She now shares her advice via Her Hairstyle Blog where you can get tips on hair care, celebrity hairstyles how-to and honest product reviews. Visit Her Hairstyle Blog today.