Things You'll Need
Scissors
Yarn needle.
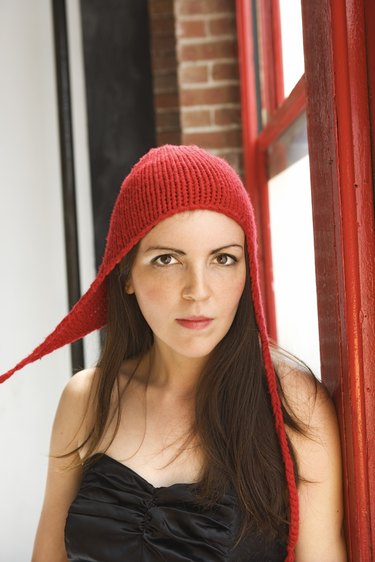
Knitting looms can be used to make a wide variety of projects, including hats. Some hats are long and bunch up on top of your head, some include pom-poms or tassels or decorative stripes, but for maximum warmth, a hat with ear flaps built in cannot be beat. Adding ear flaps to your loom knit hat is a simple process, requiring a couple of loom knitting skills that only increase the breadth of any loom knitter's skill set.
Making Ear Flaps
Step 1
Count the pegs on your loom and locate the pegs at the 12 o'clock (right next to the anchor peg that projects from the side of the loom), three , six and nine o'clock pegs. Your ear flaps will be knit onto the loom at three and six o'clock.
Video of the Day
Step 2
Make a three-peg i-cord at the three o'clock position. Make a slip knot and slide it on the peg immediately to the left of the three o'clock peg and then e-wrap the next two pegs. E-wrapping means to wrap the yarn around the peg carrying the yarn around from the inside of the loom, around the right side of the peg and back around to the inside of the loom on the left side of the peg, making a cursive "e" of yarn around the peg when viewed from inside the loom. Wrap the yarn around the outside of the loom, draping it above the loops already on the pegs. Knit the center peg — lift the bottom loop over the top of your peg and drop it to the inside of the loom — then the right peg and lastly the left peg. Repeat in this order until your i-cord is approximately 9 inches long.
Step 3
Begin your earflap. Instead of knitting the pegs in the center-right-left order, wrap the pegs and knit off in flat work order — right, center and left. Carry the yarn across the inside of the loom, e-wrap the peg immediately to the right of your row, carry the yarn back around to the outside of the loom, in front of all four pegs and e-wrap the peg to the left of your first three pegs twice. Purl across from right to left — slide your loom tool between the top loop and the peg, grab the bottom loop with the tool and pull it up under the top loop, over the top of the peg and down to the inside of the loom. You now have five stitches in your ear flap.
Step 4
Knit another row around. On the next row, increase another two stitches if you would like your ear flap to be wider, again purling. By alternating knit and purl rows, you are making a garter stitch ear flap, which will lay flat, as opposed to a stockinette ear flap — knitting each row — which will curl inward. Continue in garter stitch until your ear flap is long enough to cover your ears, about 4 to 5 inches. Cut your yarn, leaving a 4-inch tail of yarn. Leave it on the loom.
Step 5
Repeat this process to make a second ear flap at the nine o'clock position. Cut the yarn again, leaving another 4-inch tail of yarn. Leave the ear flap on the loom.
Video of the Day
Making the Hat
Step 1
Cast on your loom for a basic hat. Make a slip knot and slide it on the anchor peg. E-wrap all pegs, moving around your loom in a clockwise direction. Knit the pegs on which your ear flaps are hanging to knit the flaps onto your hat brim.
Step 2
E-wrap your pegs twice more, leaving you with three loops on each peg. Knit the pegs by lifting the bottom loop up and over the upper two loops and off the peg to the back. E-wrap around again and repeat the process, continuing for 5 to 8 inches, depending on how large you want your hat to be.
Step 3
Bind off your stitches. When you get to the last row, knit your bottom loop over the top two. Do not wrap the yarn around your loom again but knit the second loop over the top one. Cut your yarn, leaving yourself 3 feet or more of yarn hanging off the loom. Thread the yarn tail onto a yarn needle and thread it through each loop on your loom, removing each loop as you thread it.
Step 4
Pull on your yarn tail to close the top of your hat. Turn the hat inside out and push the needle through to the inside of the hat, bringing the yarn tail with it. Run the tail through the stitches of your hat to secure the yarn. Tie your yarn off if you wish by looping the yarn around one stitch and then knotting it to itself. Turn your hat right side out again.
Tip
Embellish your hat with a pom-pom or tassel at the crown, if you wish.