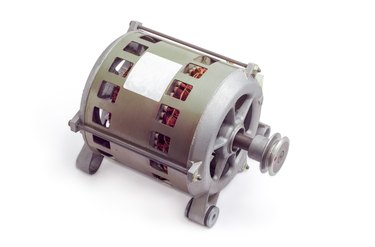
Electric motors can be found in all manner of home appliances and garage machinery. Washing machines, dryers, household heating units and stationary power tools like band saws and table saws all use electric motors as a core operating component. Generally, these appliances and power tools use dual-voltage alternating current (AC) electric motors, capable of running on either 110 volts (V) or 220 volts of electricity.
However, because the amount of power used by the motor can affect the performance of the machine using it, not every appliance can be plugged into a power circuit and used immediately; instead, you may need to configure the motor for either 110V or 220V service. Configuring motors in this way isn't difficult – all you need are common household tools, attention and a bit of patience.
Video of the Day
Video of the Day
Dual-Voltage Motors, Single-Phase Power
The dual-voltage electric motors that power machines in and around your home run on alternating electric current. AC motors convert electrical energy into mechanical energy like any type of electric motor, but AC motors are distinguished by their use of electromagnets and variable electric current; by using these, the motor is capable of running on a varied amount of electricity. In most home appliances and power tools, this is expressed through high and low-output operating modes, based on the voltage supplied to the motor when it's plugged in.
Today, all residential and most commercial buildings in the United States are supplied with single-phase electrical service that can deliver either 120V or 240V to a device, depending on how the device is wired. Dual-voltage electric motors are designed to run on either amount of power (though they are commonly labeled as 110/220V motors out of habit by manufacturers), and can be set to use one voltage or the other. To convert a 220V motor to 110V mode, then, all you need is to adjust the wiring configuration.
220V and 110V Wiring Basics
When you purchase and install a new appliance or standing tool containing a dual-voltage electric motor, it comes pre-wired for either 110V or 220V service. The user operations manual or an informational sticker should note which voltage the machine's motor comes wired for.
By design however, this setting can be switched – and switching between the motor's 220V or 110V wiring settings won't require additional wires or adapters. Instead, the wires linking the motor's speed coils to the power supply need to be reconfigured. In most dual-voltage motors, this is done by adjusting the links between certain wires or by connecting a set combination of colored wires to the power terminal. These wires and terminals are located within the terminal plate – a plastic or metal casing located on either the side of the motor (in machines where the motor is external and visible) or behind a panel on the side or rear of a machine's casing (in instances where the motor is internal).
To access the terminal plate and wire your machine's motor for its desired voltage setting, you need a pair of needle-nose pliers and a screwdriver.
Accessing the Terminal Plate
Before accessing the wiring of your machine's motor, it's important to take safety precautions. Begin by unplugging your machine from its power source or turning off power to the area via a circuit breaker box. Next, use the informational materials provided with the machine to locate the terminal plate's cover – then remove it by unscrewing the cover from the plate. Behind the terminal plate cover, you will see a number of multicolored wires, possibly connected with wire nuts (there may be one or more spare wire nuts attached to the terminal plate cover). These are the wires you will need to adjust to switch your motor's voltage settings.
Take a photo or take detailed notes to record the original placement and connections of the wires, then look for a 120 and 240 Volt electric motor wiring diagram. Often, this diagram will be located on the back of the terminal plate's cover or in the operations manual. This diagram shows how each wire should be connected in order for the motor to operate properly in the low or high-voltage modes.
Switching Settings at the Terminal Plate
Once you've gained access to the terminal plate and have studied the motor wiring diagram, you may begin the process of wiring the motor. While the exact details will depend on the way your dual-voltage motor has been wired, generally you will need to use either a screwdriver or your hands to disconnect specific wires from the power terminal or from wire nuts. Needle-nose pliers may then be used to disconnect wires from one another and reorient them for the desired voltage mode.
Be careful and patient while working with the wiring, ensuring that there are no breaks in the wires and that each wire is tightly secured – and if you encounter a problem, do not be afraid to call a professional electrician for help. Once you've adjusted the wires in accordance with the motor wiring diagram, replace the terminal plate cover and restore power to the machine. It should now operate in the desired voltage mode.
Take note, however: certain standing power tools may require the installation of a high-voltage plug while using the high-voltage setting. The user operations manual should note whether this is the case.