When your roof needs to be replaced, often you have to have the entire roof removed before you begin to replace it. But if you have an old home with a decaying roof, especially a low-pitched roof, removing the old roof and replacing it may not be practical. In this case, you can build a new roof over the old – with a caveat. You must not build the new roof directly over the old. A new coat of shingles over decaying shingles will cause your roof deck to decay. The solution is changing the roof pitch or building a new roof at a higher pitch than the old roof.
Video of the Day
Raise the Roof Pitch
Video of the Day
The roof pitch is how much the roof slants. You're going to want the pitch of your new roof to be steeper than that of the old roof. If you choose a simple trussed roof or addition with two angled planes, that will be the easiest project. And this is a project best saved for dry weather. Before you start, you should have an engineer or architect verify the structural integrity of your home. The cheapest option would be to leave the old roof in place and place the new rafters over the existing roof.
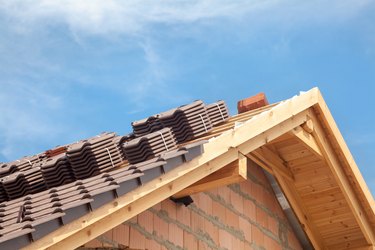
Use Premade Roof Trusses
Premade roofing trusses will be easier and take less time than installing a stick-built roof. Premade trusses will form the skeleton of your new roof above your old roof. Make sure the pitch of the trusses is the pitch that you want for your new roof. A common house roof pitch is 5 by 12, which means it slopes up from the wall at 5 inches per foot.
Things You’ll Remove
You'll need to remove the siding where it meets the roof. Remove the top several levels to expose the wall. You'll also need to remove the soffit. Take care if there are any electrical outlets in the soffit. Make sure to disconnect those before starting. Once the soffit is removed, the old roof trusses are exposed.
Installing the New Roof
To provide a framework for the new trusses, nail 2-by-6-inch strips of wood around the perimeter of the roof. Or, if you want to raise the roof a bit more, install fascia around the roof perimeter, attached to the new soffit, and nail the new roof deck to crown molding above the fascia. Make sure you plan all this well in advance so you're prepared when you do the installation.
If possible, remove any plywood under the old roof, especially if it's rotting. Also, remove any flashing and air vents by prying out or unscrewing the fasteners that hold in the fixture.
Doing the Heavy Lifting
Once your demolition is complete, you'll need to set your trusses in place over the existing rafters. To be safe, you'll need several people to assist you. The trusses should be placed 24 inches apart. Consider that each truss is likely 1 and a half inches wide, so take that into your calculation. To properly install each truss, you will use 2 by 4 wood strips from the ground up to hold the truss in place on each side of the roof. For safety purposes, it's best to have two people hold the truss in place where it meets the 2 by 4 and one or two people to set the truss upright and fasten it. Use a level to get the truss vertically plumb, and fasten it to the walls through the truss bearing point with framing nails and a hammer.
Once the row of trusses is complete, set a ridge board across the top to connect them from each end. Then nail the trusses to the ridge board. Use a level to make sure the ridge board stays even. To fasten the trusses to the wall caps, use hurricane clips, which are metal brackets that hold the trusses tight to the walls. Do this on both sides.
Replace any wall cladding you tore off, and install new soffit and fascia.
Nail the trusses into the existing room fasteners. Once the trusses, soffit and fascia are in place, lay the roofing felt in place. Now you can begin shingling your roof, preferably with asphalt shingles. Nail the shingles to the felt, starting from the outside in, and cutting to fit when you reach a corner or edge.
Steps to Finish the Job
Install flashing at the roof eave and rake using drip edge flashing. Install the eave flashing first, then the rake. These should look neat at the corners. Nail these at the high points of the roof. Install metal flashing where you have air vents, holding it in place with roofing cement. You'll need to use step flashing around a chimney and protect it with counter flashing. The counter flashing will need to be bent even with the brick design on the chimney and set into place with mortar.
Your new roof will likely have greater longevity than a flatter roof, and it will likely allow more room for insulation, helping you to lower your energy costs. It's a good idea to add insulation to the new space between your old roof and your new roof.