When painting a room, most people paint the ceiling first. Unfortunately, it's easy to slop a little wall paint onto the freshly painted ceiling when cutting in the walls. Some people can live with these imperfections, but they tend to drive the rest of us crazy. Whether you overestimated the steadiness of your hand or need to repair the work of the previous homeowner, it's easy to fix a bad paint job where the ceiling meets the wall.
Don't Shortcut the Process
Video of the Day
Fixing some painting mistakes, such as drips, means essentially starting over again by sanding away the problem and starting fresh. Fixing the line where the ceiling meets the wall is less complex, however, and requires much less work. That doesn't mean that you can shortcut the process, however. Make sure you use painter's tape, as skipping this step is likely what led to the sloppy edge in the first place.
Video of the Day
Don't try to skip out on the primer either. In a typical room, the ceiling paint is white, and the walls are darker than the ceiling, If you don't apply primer, the wall color may bleed through your repair and be noticeable on the ceiling even after your fix.
Things You'll Need
Broom or dry cloth
How to Fix a Bad Paint Job Where the Ceiling Meets the Wall
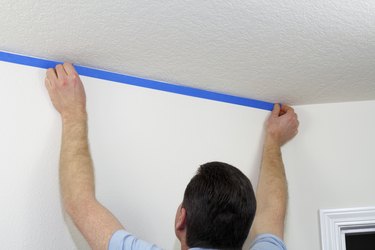
Step 1: Tape Off the Wall
Before taping off the wall, give it a quick wipe down with a dry cloth or broom. Debris and dust can prevent painter's tape from sticking as it should, and this can allow the paint to wick around and get behind the tape.
- Wait for both the ceiling paint and the wall paint to dry completely. If the paint is still wet, it will streak when you try to paint over it, causing an even larger area of unwanted paint.
- Sweep or dry dust the wall where the tape will go.
- Apply painter's tape to the wall. Take your time and make sure you position the tape exactly where you want your edge. This is the line you'll have when you're finished, so it needs to be right.
Step 2: Prime and Paint
When both priming and painting, it's important to use high-quality products. Cheap paint doesn't cover as well and can be frustrating to work with. It's also more likely to drip and cause other problems. Be sure you're using a high-quality paintbrush as well.
- Apply a coat of primer along the edge of the ceiling where it meets the tape. Allow it to dry.
- Paint your ceiling color along the edge of the ceiling where you primed. Use two coats of paint, allowing the paint to dry between coats as directed by the label on the paint can. Use short, even strokes.
Step 3: Inspect and Remove Tape
Check your paint repair job thoroughly when you think you're finished. If you can, have someone else check your work with a fresh set of eyes. If you need to touch up your fix or address a skipper, you'll want to do so while the walls are still taped and your paintbrush is still dirty.
- Keep an eye on your repair job as the paint dries. If you see the wall paint bleeding through the new ceiling paint, you'll have to apply another coat of paint.
- Wash your brushes and seal your paint can while you're waiting for the paint to dry.
- Allow the paint to dry for one hour and then remove the painter's tape. At this time, the paint will be at the perfect level of dryness to remove the tape cleanly without bringing the paint along. Pull the tape slowly and consistently.