
How to Run Electrical Wire to a Garden Fountain

A garden fountain can cool down those hot summer days a little, and it's a great place for bird watching, but you don't want to trip over electrical wires on your way to it. Above-ground wires are not only a tripping hazard, they can get damaged and create an electrical or fire hazard. To be safe, and to keep the wire out of view, you should bury it.
Planning the Fountain
Before you build your fountain, it's a good idea to plan its location to minimize the materials you need and amount of digging you have to do. You also need to decide whether to hardwire the fountain or install a receptacle to plug it into -- in most cases, a receptacle is more useful. Once you've determined the path of the trench you need to dig, it's important to obtain a map of buried pipes and cables on your property. You can call 811 from anywhere in the country to receive this information. This call prevents you from severing a cable and cutting water, power or phone service to your house.
Connecting the Cable
Whether you install a receptacle or run a cable all the way from the house to the fountain, you'll need to tie into an electrical circuit connected to the main panel of your house. After making this connection, you need to run the cable through the siding and down to the ground; run the cable through a PVC conduit body screwed to the side of the house to keep it protected. The conduit connected to the conduit body should extend to the depth of the trench you dig, for which you have three options.
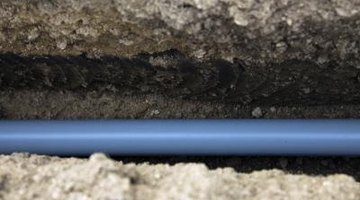
Trench Depth
Trenching can be a lot of work, and if you don't want to rent a trench digger, you'll want to limit the depth of the trench. You only need to dig a 6-inch trench if you enclose the cable in waterproof galvanized conduit, but if you're prepared to dig 12 inches, you can save the expense and trouble of conduit by using UF cable. This option is available only for grounded 120-volt power connected to a 20-amp breaker. If you want to operate a 240-volt pump, you need to enclose THWN cable in PVC conduit and bury it 18 inches deep.
Installation Details
You should dig your trench about 2 inches deeper than it needs to be so you can add a layer of sand -- this facilitates drainage and keeps the cable away from sharp rocks. In most cases, you'll want to terminate the cable at a receptacle. The receptacle needs to be a ground fault interrupting, or GFI, one, and it should be at least 12 inches above the ground. Use a weatherproof box to hold the receptacle and enclose the length of cable that extends from the ground to the box in conduit for protection from weather and damage.
References
Writer Bio
Chris Deziel has a bachelor's degree in physics and a master's degree in humanities. Besides having an abiding interest in popular science, Deziel has been active in the building and home design trades since 1975. As a landscape builder, he helped establish two gardening companies.
Photo Credits
- benkrut/iStock/Getty Images
More Articles