If you want to add a showy, tropical-looking shrub to your landscape, the Mexican Bird of Paradise (Caesalpinia mexicana, also known as Erythrostemon mexicanus) may be just what you're looking for. It's a big, vigorous shrub or small tree that can exceed 15 feet in height in favorable climates, and its vivid evergreen foliage is ornamented in season with large clusters of brilliant yellow blossoms. Propagating this shrub is straightforward through seed, though you have other options as well.
Bird of Paradise Type Plants
Video of the Day
It's worth taking a moment to clarify that Mexican Bird of Paradise is in no way related to the "true" Bird of Paradise, Strelitzia reginae (the bold, orange-colored variety) or S. nicolai (the white cultivar). Those are tropical plants, related to bananas. Mexican Bird of Paradise and its close kin, C. gilliesii (yellow Bird of Paradise) and C. pulcherrima (red Bird of Paradise, or Pride of Barbados), are part of the larger Fabaceae family, better known as legumes.
Video of the Day
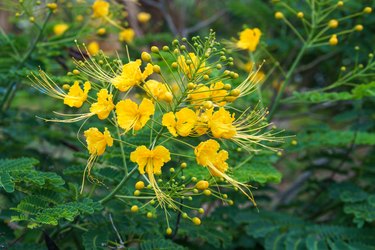
All three are sometimes grouped together as "Mexican" Birds of Paradise, but you can tell them apart by their flowers: C. mexicana has lemon-yellow blossoms, C. gilliesii has yellow blossoms with red stamens, and C. pulcherrima blossoms skew to red with lots of orange and yellow accents. They make an impressive show when grown together, and all three favor warm, arid climates. In practice, C. mexicana is more cold-tolerant than its cousins: They're hardy in USDA zones 9 through 11, while Mexican Bird of Paradise can be grown successfully down to zone 8. While it dies back, it can recover from temperatures as low as 15 degrees Fahrenheit if well protected with a thick layer of mulch.
Propagating Caesalpinia Mexicana From Seed
So what's the best way to plant a Mexican Bird of Paradise? The simplest method is to grow them from seed. Like many other legumes, C. mexicana produces large, easy-to-handle seeds in elongated pods, which you can harvest in late spring. At full maturity they'll pop and spray seeds everywhere, so harvest before they're completely brown and dry. Store the pods in a dark, dry spot in a brown paper bag, until they've dried and split open.
To plant, separate the seeds — they look like flattened-out peas — from their pods. Like sweet pea seeds, they have an extra-tough seed coat, and you'll get better germination if you abrade them lightly with a piece of fine sandpaper. Next, soak the seeds for a few hours in warm water (abrasion of the seed coat, or "scarification," speeds absorption of the water and helps them sprout). Plant them about 1/2-inch deep in a well-lighted spot with good drainage. If necessary, use a fast-draining potting mix suited for succulents and other arid-climate plants.
Keep the soil moist during the sprouting and seedling stages, then gradually reduce the water as the plant matures. Once your seedlings are sturdy and have multiple sets of true leaves, they can be transplanted into large pots as container plants or moved to permanent locations in your landscape.
Propagation Through Cuttings
Because propagating from seed is so easy and reliable, you might find it hard to track down information on other propagation methods. A useful "cheat" is to search out instructions for C. pulcherrima instead, because it's much more widely grown. Like the Red Bird, C. mexicana can be grown from a cutting if you don't want to wait for seeds.
You need a softwood cutting (i.e., from new spring growth, not older wood), harvested in spring or early summer. Choose a shoot with no buds or blossoms, and cut it to a length of 4 or 5 inches. Pinch off the tip and then snip away leaves from the bottom inch or so of your cutting. Dip the cut end in rooting hormone, and then gently insert the end of the cutting into potting mixture so the remaining leaves just rest at the surface.
Water the cutting and cover it with a plastic bag to retain moisture and ensure a favorable microclimate, then place your cutting in a warm spot with lots of indirect light. Remove the bag for a few hours every couple of days, for ventilation. Continue until the cutting shows vigorous new growth, at which point the bag can come off permanently. After the cuttings are large and sturdy, they can be potted into larger containers or moved to permanent locations outdoors.