
How to Make a Concrete Catch Basin

Catch basins serve to direct the flow of water to control erosion and to eliminate the problems associated with standing water and flooding. Most often used in a municipal setting, catch basins are also helpful in residences where roof runoff creates a drainage problem for the homeowner or his neighbors. Concrete is the preferred material in new catch basins but care must be taken to prevent water backup.
-
Locate an area on the outside perimeter of your house or building where the rain water can be easily re-routed. Do this by installing guttering sloped to drain into one common drainpipe, which then empties into the catch basin.
-
Excavate an area beside the buried portion of your foundation and directly beneath the main drainpipe. For most homes, a 2-by-2-foot catch basin is sufficient when coupled with a 6-inch drain. If the surface area of your roof is larger than 4,000 square feet or if you live in an area with frequent drenching rains, you can make the catch basin larger.
-
Construct a plywood form to hold the concrete. Do this by driving support poles into the bottom of the excavated area, outside the desired perimeter of the catch basin and attach plywood, cut to size, on the inside of the supports. Leave the side closest to the foundation bare so there is no space between the basin and the foundation.
-
Drill three horizontal holes into your foundation, 2 inches in from the outside plywood wall. The holes should be 3 inches deep and ½ inch in diameter. Insert a horizontal piece of rebar into each one. The rebar should be long enough so that it extends at least 1 foot into the wall form.
-
Allow for a minimum of 4 inches of concrete thickness for your catch basin walls and install the interior plywood forms, using the same method of driving the poles into the ground for support and nailing the plywood to the poles.
-
Reinforce your catch basin form by driving the rebar into the ground within the 4-inch wall space. Contact your local building authority to find out if there is a code you must follow when placing the rebar. Otherwise, place them at 8-inch intervals.
-
Trench in your drainpipe at this time. The drainpipe that will service your catch basin must be located along the bottom of a sidewall and slope downwards to a curb or drywell. Make sure you have enough slope on your pipe so the water runs quickly.
-
Pour the walls of your catch basin with concrete and allow them to cure before removing the plywood forms and pouring the bottom of the basin. Before you pour the bottom, add 3 inches of sand to prevent future cracking and settling.
-
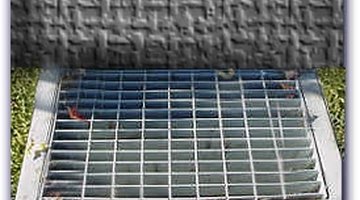
Fill the concrete catch basin with large rocks and gravel, using the larger rocks on the bottom and the smaller gravel on top. Place wire mesh or a grate on top of the basin to prevent large debris from falling in. In addition, commercial flow directors are available and you can place one in your catch basin to filter most of the sediment from the water.
- Excavating tools
- Dimensional lumber
- Plywood
- Carpenter's tools
- 6-inch PVC pipe
- Concrete (ready-mix)
- Rebar
- Sand
- Concrete drill and 1/2-inch bit
- Grate
- Rocks and gravel

Things You Will Need
Tip
In areas where a lot of dust collects, a catch basin may clog with mud over time. Consider installing a removable filter 2 inches under the gravel to trap the sediment.
Writer Bio
Glenda Taylor is a contractor and a full-time writer specializing in construction writing. She also enjoys writing business and finance, food and drink and pet-related articles. Her education includes marketing and a bachelor's degree in journalism from the University of Kansas.
Photo Credits
- Author images
- Author images
More Articles